daring bakers: french bread
another month, another daring bakers’ challenge. and what a challenge it was – julia child’s french bread!
julia child is a name that i have become familiar with since i started reading blogs from around the world. she was america ’s first celebrity chef who was at the height of her fame in the 1960s after she published mastering the art of french cooking, a summary of what she and two fellow graduates learnt at the cordon bleu cookery school in paris . she has been credited with inspiring a boom of french restaurants and fresh food markets across america . sadly she died in 2004.
so, julia child’s french bread, how did i get on?
the full recipe, printed off in a small font, was an intimidating seven pages of instructions! however having read it through a few times and having watched these hugely helpful videos of julia talking to danielle forestier as she makes the bread, i was ready to go. the recipe below is my version and only contains the instructions for a handmade bread. if you’d like to see the full version (include various tips in case things go wrong at various points), please visit the sour dough or i like to cook, the blogs of the two ladies, mary and sara, who are responsible for choosing this challenge!
as long as you have plenty of time the recipe is actually quite simple and at each stage i managed to achieve the desired result. the vigorous pre-kneading method of working the dough was great to learn, if a bit noisy, and is a technique i’ll use again if i’m working with a wetter than usual dough. the broken pizza stone was, i think, the result of my rushed and over-enthusiastic brushing of the top of the bread with water, as it cooked.
the final verdict:
would i have tried this recipe if it hadn’t been a part of the daring bakers challenge? i probably wouldn’t have chosen a julia child recipe but yes, i’d have very happily spent a day attempting to make french bread.
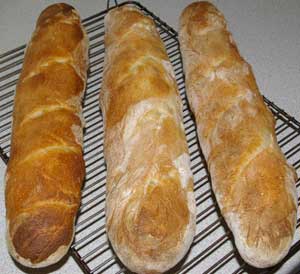
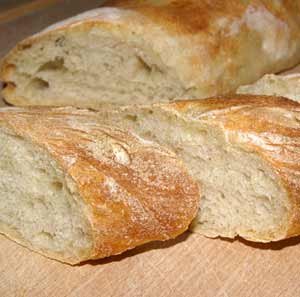
would i try this recipe again in the future? the bread tasted great and had a wonderful slightly chewy texture but it wasn’t, by any stretch of the imagination, an authentic french batard. the texture was too dense and the crust not quite crusty enough. i’d definitely make the recipe again and experiment with different styles for shaping the bread, perhaps choosing the thinner ficelle and leaving it to rise for longer to see if can increase the number of larger air holes. i also need a sharper razor blade!
julia child’s french bread* (makes 3 batards)
7g instant yeast
75ml warm water
500g strong white flour plus extra
2 ¼ teaspoons salt
280-300ml tepid water
step 1: the dough mixture – le fraisage (or frasage)
mix the yeast with the 75ml warm water and let it liquefy completely while measuring the flour into mixing bowl. when the yeast has liquefied, pour it into the flour along with the salt and the rest of the water.
stir and cut the liquids into the flour with a rubber spatula, pressing firmly to form a dough and making sure that all the bits of flour are gathered in. turn the dough out onto kneading surface, scraping the bowl clean. the dough will be soft and quite sticky. let it rest for 2-3 minutes while you wash and dry the bowl.
step 2: kneading – petrissage
the flour will have absorbed the liquid during this short rest and the dough will have a little more cohesion for the kneading that is about to begin. use one hand only for kneading and keep the other clean. your object in kneading is to render the dough perfectly smooth and to work it sufficiently so that all the gluten molecules are moistened and joined together into an interlocking web. you cannot see this happen, of course, but you can feel it because the dough will become elastic and will retract into shape when you push it out.
start kneading by lifting the near edge of the dough, and flipping the dough over onto itself. lift the dough off the surface and slap it down; lift the front edge and flip it over again, repeating the movement rapidly. the video helpfully shows this kneading style.
in 2-3 minutes the dough should have enough body that you can give it a quick forward push with the heel of your hand as you flip it over (this is the method that i normally use to knead dough and might be familiar to you too). continue to knead rapidly and vigorously - if the dough remains too sticky, add a sprinkling of flour. the whole kneading process will take c10 minutes to reach the stage when the dough has enough elasticity so it draws back into shape when pushed. this indicates that the gluten molecules have united and are under tension like a thin web of rubber; the dough should also begin to clean itself off the kneading surface, although it will stick to your fingers if you hold a pinch of dough for more than a second or two.
let dough rest for 3 – 4 minutes. knead for another minute. the surface should now look smooth; the dough will be less sticky but will still remain soft. it is now ready for its first rise.
step 3: first rising – pointage premier temps; 3-5 hours at around 70 degrees
you now have approximately 450ml of dough which needs to rise to 3 ½ times its original volume. wash and fill the mixing bowl with 1.5 litres tepid water and make a mark to indicate that level on the outside of the bowl (the bowl should have fairly upright sides; if they are too outward slanting, the dough will have difficulty in rising). pour out the water, dry the bowl, and place the dough in it (you can very lightly grease the bowl to prevent the risen dough from sticking to the bowl).
slip the bowl into a large plastic bag or cover with clingfilm, and top with a folded towel. set on a wooden surface (marble or stone are too cold) or on a folded towel or pillow, and let the dough rise, free from drafts, somewhere that the temperature is around 70 degrees. if the room is too hot, set the bowl in water and keep renewing the water to maintain around 70 degrees. the dough should take at least 3-4 hours to rise - if temperature is lower it will simply take longer.
when fully risen, the dough will be shaped into a slight dome, showing that the yeast is still active. it will be light and spongy when pressed and there will usually be some big bubbly blisters on the surface. if you are using a glass bowl you will see bubbles through the glass.
step 4: deflating and second rising – rupture; pointage deuxieme temps; 1 1/2 to 2 hours at around 70 degrees
the dough is now ready to be deflated, which will release the yeast engendered gases and redistribute the yeast cells so that the dough will rise again and continue the fermentation process.
with a rubber spatula, dislodge the dough from the bowl and turn it out onto a lightly floured surface, scraping the bowl clean. if the dough seems damp and sweaty, sprinkle it with a tablespoon of flour. lightly flour the palms of your hands and flatten the dough firmly but not too roughly into a circle, deflating any gas bubbles by pinching them.
lift a corner of the near side and flip it down on the far side. do the same with the left side, then the right side. finally, lift the near side and tuck it just under the edge of the far side. the mass of dough will look like a rounded cushion ( this technique is shown in the video mentionned earlier ). slip the sides of your hands under the dough and return it to the bowl. cover and let rise again, this time to not quite triple, but again until it is dome shaped and light and spongy when touched.
step 5: cutting and resting dough before forming loaves
loosen the dough all around the inside of the bowl and turn it out onto a lightly floured surface. because of its two long rises, the dough will have much more body. if it seems damp and sweaty, sprinkle it lightly with flour.
making clean cuts with a large knife, divide the dough into 3 equal pieces for your batards. after you have cut each piece, lift one end and flip it over onto the opposite end to fold the dough into two. place the dough at the far side of the kneading surface and cover loosely with a sheet of clingfilm, letting it rest for 5 minutes before forming. this relaxes the gluten enough for shaping but not long enough for dough to begin rising again.
while the dough is resting, prepare the rising surface and smooth the prepared linen towelling** on a large tray or baking sheet.
step 6: forming the loaves – la tourne; la mise en forme des patons
because french bread stands free in the oven and is not baked in a pan, it has to be formed in such a way that the tension of the coagulated gluten cloak on the surface will hold the dough in shape. again, the video is incredibly helpful for understanding the technique of shaping the dough.
after the 3 pieces of dough have rested 5 minutes, work with one piece at a time, keeping the remaining ones covered.
working rapidly, turn the dough upside down on a lightly floured kneading surface and pat it firmly but not too roughly into an 8-10” oval with the lightly floured palms of your hands. deflate any gas bubbles in the dough by pinching them. fold the dough in half lengthwise by bringing the far edge down over the near edge.
being sure that the working surface is always lightly floured, so the dough will not stick and tear, which would break the lightly coagulated gluten cloak that is being formed, seal the edges of the dough together, your hands extended, thumbs out at right angles and touching.
roll the dough a quarter turn forward so the seal is on top. flatten the dough again into an oval with the palms of your hands. press a trench along the central length of the oval with the side of one hand. fold in half again lengthwise. this time seal the edges together with the heel of one hand, and roll the dough a quarter of a turn toward you so the seal is on the bottom.
now, by rolling the dough back and forth with the palms of your hands, you will lengthen it into a sausage shape. start in the middle, placing your right palm on the dough, and your left palm on top of your right hand. roll the dough forward and backward rapidly, gradually sliding your hands towards the two ends as the dough lengthens.
deflate any gas blisters on the surface by pinching them. repeat the rolling movement rapidly several times until the dough is 16 inches long, or whatever length will fit on your baking sheet. during the extension rolls, keep the circumference of dough as even as possible and try to start each roll with the sealed side of the dough down, twisting the rope of dough to straighten the line of seal as necessary. if seal disappears do not worry.
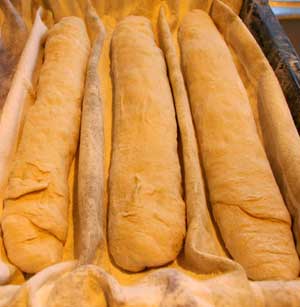
place the shaped piece of dough, sealed side up, at one end of the flour rubbed cloth, leaving a free end of cloth 3 to 4 inches wide. the top will crust slightly as the dough rises - it is turned over for baking so the soft, smooth underside will be uppermost.
pinch a ridge 2 ½ to 3 inches high in the cloth to make a trough, and a place for the next piece. cover dough with clingfilm while you are forming the rest of the loaves. after all the pieces of dough are in place, brace the two sides of the cloth with long rolling pins if the dough seems very soft and wants to spread out (i didn’t need to do this). cover the dough loosely.
step 7: final rise – l’appret; 1 1/2 to 2 1/2 hours at around 70 degrees
the covered dough should now rise until it almost triples in volume - look carefully at its pre-risen size so that you will be able to judge correctly. it will be light and swollen when risen, but will still feel a little springy when pressed. it is important that the final rise takes place where it is dry. if your kitchen is damp, hot, and steamy, let the bread rise in another room or dough will stick to the cloth.
preheat oven to 450 degrees about 30 minutes before estimated baking time. place a pizza stone, or other ceramic tiles, in the oven (metal trays are, apparently, not suitable).
step 8: unmoulding risen dough onto baking sheet – le demoulage
the 3 pieces of risen dough are now to be unmoulded from the cloth and arranged upside down on the baking sheet. the reason for this reversal is that the top of the dough will have crusted over during its rise; the smooth, soft underside should be uppermost in the oven so that the dough can expand and allow the loaf its final puff of volume. remove the rolling pins and gently dislodge the dough, leaving it on the floured cloth.
step 9: slashing top of the dough – la coupe
the top of each piece of dough is now to be slashed in several places. this opens the covering cloak of gluten and allows a bulge of dough underneath to swell up through the cuts during the first 10 minutes of baking, making decorative patterns in the crust. these should be done with a very sharp blade and you must cut almost horizontally into the dough to a depth of less than half an inch. start the cut at the middle of the blade, drawing toward you in a swift clean sweep. this is not quite as easy as it sounds, and you will probably make ragged cuts. a razor blade is suggested for extra sharpness but even this did not produce a great result for me.
for a batard make 3 slashes - those at the two ends go straight down the loaf but are slightly off centre, while the middle slash is at a slight angle between the two. make the first cut at the far end, then the middle cut, and finally the third. remember that the blade should lie almost parallel to the surface of the dough.
step 10: baking – about 25 minutes; oven preheated to 230c
as soon as the dough has been slashed, moisten the surface either by painting with a soft brush dipped in cold water, or with a fine spray atomizer. place it on the hot pizza stone and put this on a rack in upper third of your preheated and prepared*** oven. rapidly paint or spray dough with more cold water after 3 minutes, again in 3 minutes, and a final time 3 minutes later. moistening the dough at this point helps the crust to brown and allows the yeast action to continue in the dough a little longer. the bread should be done in about 25 minutes - the crust will be crisp, and the bread will make a hollow sound when thumped. one batch of my bread took c20 minutes and the other the full 25 minutes so pay attention!
if you want the crust to shine, paint lightly with a brush dipped in cold water as soon as you slide the baking sheet out of oven.
step 11: cooling – 2 to 3 hours
cool the bread on a rack so that air can circulate freely around each piece. although bread is always exciting to eat fresh from the oven, it will have a much better taste when the inside is thoroughly cool and has composed itself.
step 12: storing french bread
because it contains no fats or preservatives of any kind, french bread is at its best when eaten the day it is baked. it will keep for a day or two longer, wrapped airtight and refrigerated, but it will keep best if you freeze it – let the loaves cool first, then wrap airtight. to thaw, unwrap and place on a baking sheet in a cold oven; heat the oven to 400 degrees. in about 20 minutes the crust will be hot and crisp, and the bread thawed.
* from mastering the art of french cooking: volume two by julia child and simone beck
** i used a large clean tea towel and sprinkled it liberally with flour. work the flour into the weave of the fabric so it fills all of the small holes. turn the cloth over and repeat. this stops the dough sticking to the fabric while it is rising. if you are planning to make more batches of bread you can reuse the cloth - after each session, brush it thoroughly to remove all traces of flour and hang it out to dry before putting away.
*** baking in an ordinary oven, in the ordinary way, produces an acceptable loaf of bread but does not nearly approach the glory you can achieve when you turn your home oven into a baker’s oven. merely providing yourself with the proper amount of steam, if you can do nothing else, will vastly improve the crust, the colour, the slash patterns, and the volume of your bread; steam is only a matter of putting a heated brick or stone into a pan of water in the bottom of the oven.
alternatively (and this is the method i used) put a metal baking sheet on the bottom rack of the oven. when you put your dough in to start cooking, tip in some ice cubes into the tray and add a splash of warm water. the temperature difference between the ice cubes and the warm water will create steam. add an extra splash of water each time you brush/spray they loaf with water.